How Do I Create the Basic Theme Files?
In the previous lesson, we created our WordPress in Cloud 9. Now, we can begin creating our own theme. The initial theme files will allow you to activate your custom theme in your WordPress Appearance Dashboard. After completing these steps, you will have activated your custom theme. Although it won’t be very useful yet, it will contain the minimum files needed to start building your theme.
Create A Folder For Your Theme
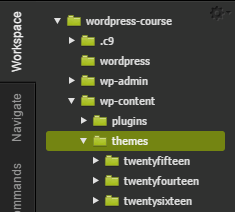
Identify the themes folder in your WordPress directory:
- wordpress » wp-content » themes
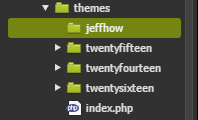
Create a custom folder for your theme. Theme folder names should contain all lowercase letters without spaces.
Create Your Theme Stylesheets
Your WordPress theme must contain a file named “style.css” with meta data before it will appear properly in your dashboard. This file can contain all of your CSS code or you can use multiple files as needed. WordPress looks for this file to identify its name, description, author, and any other useful information you provide about the theme.
Create “style.css” in your theme folder.
Open “style.css” and add meta information that describes your theme.
/*
Theme Name: <name>
Theme URI: <theme URI>
Author: <author name>
Author URI: <author URI>
Description: <describe your theme>
Version: 0.0.1
License: <license>
License URI:<license URI>
Tags: <list appropriate tags>
*/
This information will appear in the description of your theme in the WordPress dashboard. For this course, you’ll need to supply at least the “Theme Name.” I also recommend adding the theme URI (You can use your workspace URI for now). This will prevent WordPress from confusing your custom theme with another theme of the same name in the WordPress store.